A Fun Activity
Construct a Marshmallow Blow Gun from PVC Pipe
Marshmallow guns/shooters are a big hit with kids and adults. They simply shoot mini marshmallows out of a series of PVC pipe using you’re your breath. These guns are very easy and inexpensive to build, and only take about a half an hour to create. You can also find them online already assembled for $5 TO $10 (before shipping). When constructing them yourself, you could make 3 for under $5 (not decorated). I have found them useful for cheap and unique party favors. There are plenty of party games that you could come up with using Marshmallow shooters; then each guest can take theirs home along with a small bag of marshmallows. You can even design them to fit any party theme or style. You can add paint, stickers, electrical tape, spray glitter or whatever else that comes to mind to jazz them up.
Here are some simple instructions on how to make marshmallow shooters:
1. Gather your materials; you will need:
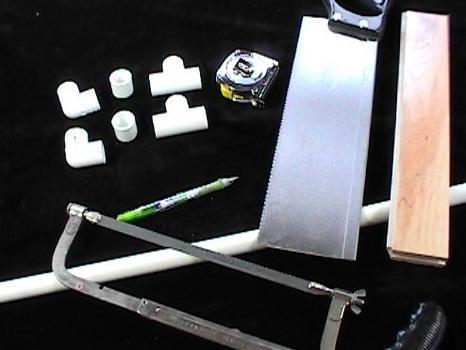
- 2 - 1/2 inch PVC Caps
- 2 - 1/2 inch PVC Elbows
- 2 - 1/2 inch PVC Tees
- 1/2 inch PVC Pipe - (typically comes in 10 feet pieces, for one gun you will need 3 feet)
- 4 - 4 inch pieces of PVC Pipe
- 2 - 6 inch pieces of PVC Pipe
- 1 - 8 inch pieces of PVC Pipe
- Hand Saw or PVC pipe cutters
- Ruler
- Marker
- Sand Paper
- Paint, Electrical Tape, Stickers, etc. to decorate the guns (optional)
- Mini Marshmallows
2. If you haven’t already, cut your PVC pipe into their correct lengths using a ruler and hand saw or PVC cutters. You will need four 4 inch pieces, two 6 inch pieces and one 8 inch piece.
3. Next you will need two of your 4 inch pieces, your 8 inch piece and a tee connector. Insert a 4 inch piece in the bottom of the connector, then going horizontally insert your other 4 inch piece and the 8 inch piece.
4. Place a cap on the bottom of your first 4 inch piece (the one connected to the bottom of the tee). This will be one of your handles. Some like to wrap this piece with electrical tape for grips and/or decoration.
5. Put your last tee connector on the other 4 inch piece, facing in the opposite direction of the last one (it will look like an upside down T). Then attach 4 inch pieces to each of the open ends.
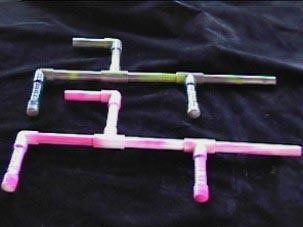
6. Now you will add elbows to the ends of the 4 inch pieces you just added. Then add another 4 inch piece to each of them. One which will become your second handle, this one will need a cap at the end; it will also point downwards along with your first handle. The other piece you are adding will be the mouth piece, which will point away from your 8 inch piece. If the tip of your mouth piece has any sharp or jagged edges you use sand paper to smooth the out.
7. Now you should have a working marshmallow shooter, even though it is pretty plain. You can decorate it with paint, stickers, electrical tape, spray glitter, or whatever else that comes to mind.
To make your paint last longer:
1. Briefly sand over all your pieces (this will help the paint adhere better)
2. Clean all your pipes
3. Apply Sealer (if not using paint made for plastic)
4. Paint (spray paint works well)
5. Seal with a water based sealer
8. Now you are ready to shoot your marshmallow blow guns! Start by sticking the marshmallow in your mouth piece a little ways, aim and blow. Quick hard breaths will work better than long ones. You should be able to shoot your marshmallows 30 feet or so.
Tips:
-Pick up your marshmallows when done; they can become a sticky mess.
-Avoid getting moisture in your guns when breathing into them. If moisture gets inside your guns it is easier for marshmallows to get stuck.
-Soft marshmallows work the best. After your marshmallows have harden they won’t shoot as well.